
June 9, 2010
81st Birthday
I made the most delicious cake for my grandpa's 81st birthday. I finally found the best homemade chocolate frosting using the recipe on the back of Hershey's special dark chocolate cocoa powder container. The dark chocolate buttercream paired with fresh raspberries is heavenly =) I made the 81 using chocolate molding clay. To make chocolate "clay", melt 10 oz of chocolate in a double-broiler, once melted transfer to bowl and add 1/3 cup of light corn syrup. I immediately poured the mixture into a ziplock bag, cut a small hole in corner of bag and drew the 81 on parchment paper. I put the chocolate in the freezer to stiffen until we were ready to sing :)

May 19, 2010
Sunflower Cupcakes
For mother's day I made sunflower cupcakes and they looked great, but tasted ehhh. I used the Martha Stewart devil's food cupcake recipe and I wouldn't make it again because it was too dry. I have made her chocolate cupcakes in the past and they are incredible so I will stick with that from now on. These cupcakes are so easy to make. I made buttercream from scratch using this recipe and it was A-mazing! I also made cream cheese frosting, but wouldn't use that again because it gets runny really fast.


April 15, 2010
"Edible Book" Contest
Today I was a contestant in my first cake competition. My university's library held an "edible book" contest in which there were five categories: Best Adult Book, Best Children's Book, Best Pun, Best Theme, and Best Overall. The only rules were 1.) It had to be edible and 2.) it had to be based on a book. My sister, a 3rd grade teacher, is currently reading Charlie and the Chocolate Factory with her gifted students and suggested that I use this theme. I agreed being that there was so much I could do using this theme, but my biggest incentive was the fact that I could make little oompa loompas! Sorry, the image is blurry, but they are so cute! I used gum paste to make them and white icing for the eyebrows.


Next, when I think of Willy Wonka, I think tons of color and candy. So going off of this, I decided to use a tier cake with purple on the bottom and pink on top. Learning from past mistakes (cakes caving in!), I used wooden dowels and cardboard to separate the tiers and give the top tier more support.
My newest obsession is TLC's Ultimate Cakeoff. After watching one episode talking about chocolate modeling clay, I became very interested in this phenomenon and went on a Google frenzy figuring out how to make it. To make chocolate modeling clay you will need 10 oz of semi-sweet chocolate and 1/3 cup of light corn syrup. Simply melt the chocolate, stir in the syrup and then spread on wax paper about 1/2 inch thick for a few hours to dry. Once it is ready, it is very easy to mold into any shape you need and can even be rolled out like fondant! And tastes much better than fondant! This is how I made the chocolate waterfall. I added chocolate frosting on top of this to add dimension.
Okay back to today's competition. I competed in the Children's Book category and Best Overall category. The competition was intense, with professional cake bakers in attendance and over 54 cakes! The competition was held on campus and open to student voting. I was runner up for the Best Overall category, receiving an "honorable mention" and a cook book. Being that this was my first competition, I was ecstatic to even be mentioned. The judges approached me after they announced all the winners and told me that my cake was phenomenal and there were only a handful of votes separating me from 1st place. Yay =)
I'm ready for my next competition!!


April 11, 2010
Scrapbooking
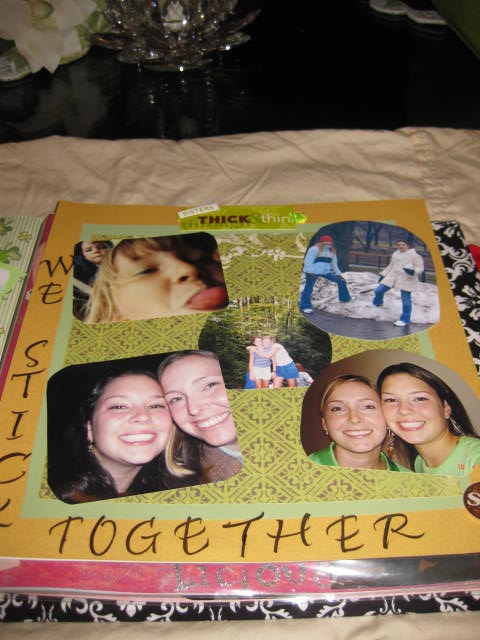
I just wanted to share some of the pages I made for my sister's scrapbook. As a wedding gift to her, I made a "Sisters" scrapbook that was a lot of fun to make and something she could have forever. I made each page a theme and kept the book in chronological order, starting from when she read to me as a baby to college graduation. I bought a regular scrapbook from Michaels and then covered it in this fabric and attached ribbon for it to tie together at the side.


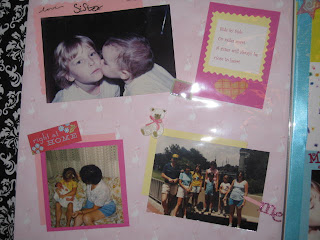


My favorite quote on the next page: "Side by side or miles apart a sister will always be close to heart"


"I'm Tying the Knot....Buy Me A Shot!"


Guitar Cake
Since the Landshark cake was such a hit, my other friend asked me to make a cake for her. The cake was for her boyfriend's birthday and she told me that he likes Harley Davidson and plays the guitar. I thought it would be cool to make the cake shaped like a guitar with a Harley theme. When I think of Harley, I think of orange, black, and red and designed the cake around this. I covered the cake with fondant and then painted it black since it is very hard to color the fondant black by kneading it in. I used Wilton's food coloring and mixed it with a little vodka to paint and it took about 12 hours to dry. The flames are made of fondant with Wilton's red pearl dust on the edges. Also, I have found Duncan Hines is the best to use when fondanting because it is denser than the other boxed cakes. As for frosting, make sure to frost the cake and allow it to chill in the fridge before fondanting so that it firms and the fondant doesn't take the shape of the frosting underneath.


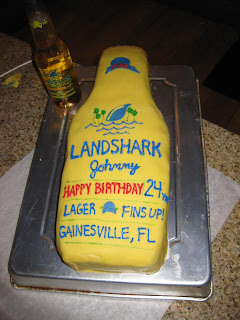
Landshark Cake
My friend asked me to help her make a cake for her boyfriend's birthday. Since his favorite beer is Landshark, we decided to try to make him a cake shaped like a landshark bottle. It was my first time making a cake where I needed to cut out the shape and fondant it. I think it came out great! The only problem I had was the fondant cracking and I think this was from using corn starch with the fondant instead of powder sugar. Also make sure to have Crisco nearby to keep on your hands when kneading the fondant. The cake as decorated using Wilton's icing writers.


March 13, 2010
Cake Creations
My second experience using fondant turned out better than the first! I designed and made this cake for my grandma's birthday and she absolutely loved it! Next time I am going to try to make my own fondant, I've heard it is easier to manage, tastes better, and no preservatives. The roses and daisies are made from gum paste.


February 25, 2010
My first attempt using fondant
I thought it was about time that I stop just watching and admiring Cake Boss and Ace of Cakes, but finally try to create a cake of my own using fondant. I was always weary of using fondant because it seems very complex and time consuming, but to my relief it was very simple!
My roommate and I decided to make a cake for my friend's birthday that looked like a gift. When we went to Michael's the only fondant they had was white, all the colors were sold out. Oh well, at least I had food coloring at home. I was hoping to create a colorful package with ribbon, but due to time constraints was only able to color the ribbon.
When using fondant you have to be very careful that it doesn't dry out and become brittle because that can happen relatively quickly. I found it very helpful to put whatever fondant you are not using at the moment in a zip lock bag.
For the cake we used funfetti (we are still in college after all). Make sure the cake cools completely. Then clear a large area where you can roll out the fondant. Lay down wax paper and sprinkle the area and the rolling pin with corn starch because the fondant can become very sticky. Once fondant is rolled flat, you can place it over the first layer of the cake. Tuck the fondant under the cake and to smooth out the edges, slit the fondant that is on the corner of the cake so it is easier to fold under.

Once the strips are hard, begin to attach to cake with icing to form a bow. We used about 18 of these strips so that the bow would be really full!
I think for my first time it turned out pretty well! I can't wait to bake for St.Patty's Day!

DIY Honeymoon gift bag
There is nothing better than giving that special bride and groom in your life a gift that is both functional and personal. For my sister's wedding, I gave her and her hubby a special going away bag with honeymoon essentials. This is such a great gift because you can personalize the package as "his" and "her", while providing much needed (and some not-needed but cute) supplies. I found most of my material at Michael's and online sites.
The bought a black and white tote bag and ironed "Just Married" onto the straps with iron-on rhinestones.
Items to put in the tote:
The bought a black and white tote bag and ironed "Just Married" onto the straps with iron-on rhinestones.
Items to put in the tote:
- "His" and "Her" towels- I bought a black towel and white towel and ironed on "His" and "Hers" with fabric letters.
- "Just Married" flip-flops
- Sunscreen
- Lip-balm
- Luggage Tags
- Do Not Disturb Sign
- Lotions
- Champagne
- Extra Batteries
Get creative and cater it to the honeymoon destination =)
February 24, 2010
Mad Hatter Tea Party
For my sister, Jenn's, bridal shower I wanted to do something fun, classy, and unique. I didn't want to throw the typical, tacky bridal shower. After much thought I came up with the Mad Hatter Tea Party theme and was excited to use some DIY tactics to decorate. I was able to find inexpensive teapots at local Ross stores and used these as vases, filled with colorful daises.

The mad hatter theme came to me because I wanted guests to come dressed up and feel involved in the festivities. All guests were required to wear a "goofy" hat.


The menu consisted of yummy finger foods and crust-less tea sandwiches
- Egg-Salad sandwiches
- Tuna with cranberry sandwiches
- Crackers topped with crab-meat salad
- Cheese and crackers
- Fruit salad
- Quinoa spinach salad
- Cranberry-ginger punch with raspberry sorbet
- Peach Bellini


Whats a party without dessert! My mom and I made cupcakes and decorate them with mini hats toppers, cake stand wrappers, edible gold and pearl emblems. All materials can be found at fancyflours.
We also found mini desserts with a tea-cup shaped chocolate base filled with cappuccino mouse. They disappeared as soon as we set them out!


Don't forget the games! We played numerous games throughout the shower. We gave scratch off's as prizes and some even turned out to be winners!
- Who knows the bride best- Create a 10-15 Q quiz, make them fun and include embarrassing events from the bride's past! I printed them out on paper with tea cups and cupcakes as the header. This is a great game to pass out as people finish eating.
- How much does the bride know about her groom- I emailed the future hubby a list of questions about himself ahead of time. The bride has to answer the questions correctly and if she doesn't she has to stuff a marshmallow in her mouth! By the end of the game she couldn't even talk she had so many marshmallows in her mouth
- What's in your purse- Make a list of things both common and uncommon that a woman may carry in her purse and assign points to each item. Gather all the women into a room and call out the items on your list. The guests have to go through their purse and if they have that item they get those points, the one with the most points at the end wins! Its a fun game that gets everyone involved and you will be surprised what women keep in their purses! It depends on your audience on how inappropriate/funny you want to get, but items we listed included pens, paper, floss, granola bar, gum, aspirin, midol, tampons, condoms, vitamins, nail polish, prescription medicine, hair brush, makeup, gas-x, and the list goes on...
- Toilet paper bride- This game involves forming teams, 2-3 depending on how many guests you have. Each team get rolls of toilet paper and they have 10 minutes to design and create a wedding gown. When time ends, the toilet paper bride must walk down an "aisle" and the real bride judges the best design. Warning, if you have competitive players this game can get rowdy =) We had 2 close contents, it was hard to choose a winner:


And one interesting design...LOL

Don't forget to have someone make a bridal bouquet out of the ribbons and bows on the gifts. The Bride uses this bouquet for her rehearsal. It's extremely easy to make- use a paper or plastic plate, cut a hole in the middle, and insert ribbon and bows through the hole! It comes out beautiful!

Subscribe to:
Posts (Atom)


